This tutorial will guide you through the process of configuring AWX to obtain dynamic inventory from Active Directory (AD) via LDAP.
Summary of Steps:
- Create Custom Credential Type for ‘Microsoft AD LDAP’
- Define a custom credential type tailored for Microsoft AD LDAP within AWX.
- Create a Credential for ‘Microsoft AD LDAP’
- Establish a credential to authenticate with Active Directory.
- Add Inventory/Playbook File to Your Git Repository
- Incorporate an inventory or playbook file in your Git repository that utilizes the
microsoft.ad.ldapplugin.
- Incorporate an inventory or playbook file in your Git repository that utilizes the
- Synchronize the Project Connected to Your Repository
- Sync the AWX project associated with your Git repository.
- Create an Inventory for ‘Microsoft AD LDAP Inventory’
- Set up an inventory within AWX specifically for Microsoft AD LDAP.
- Create an Inventory Source Using the Newly Added Inventory
- Define an inventory source that leverages the newly created inventory.
- Synchronize the Inventory and Verify Hosts
- Sync the inventory and ensure that the hosts are accurately added.
Let’s dig deeper.
- Create Custom Credential Type for ‘Microsoft AD LDAP’
From AWX web portal, go to Administration >> Credential Types >> click Add
Create New Credential Type window, give a name, input configuration and injector configuration:
Name: Microsoft AD LDAP Type
Input configuration:
fields:
  - id: ldap_server
    type: string
    label: LDAP Server
    help_text: The domain controller/server to connect to
  - id: ldap_port
    type: string
    label: LDAP Port
    help_text: Port 389 is used for LDAP and port 686 is used for LDAPS
  - id: ldap_username
    type: string
    label: LDAP Username
  - id: ldap_password
    type: string
    label: LDAP Password
    secret: true
  - id: ldap_auth_protocol
    type: string
    label: LDAP Auth Protocol
    choices:
      - simple
      - certificate
      - kerberos
      - negotiate
      - ntlm
  - id: ldap_cert_validation
    type: string
    label: LDAP Cert Validation
    choices:
      - always
      - ignore
      - ignore_hostname
    help_text: The certificate validation behaviour when using a TLS connection
  - id: ldap_ca_cert
    type: string
    label: LDAP CA Cert
    help_text: Can be the path to a CA certificate PEM or DER file, directory of PEM certificates, or the CA certificate PEM string that is used for certificate validation
  - id: ldap_certificate
    type: string
    label: LDAP Certificate
    help_text: The value can either be a path to a file containing the certificate or string of the PEM encoded certificate
  - id: ldap_certificate_key
    type: string
    label: LDAP Certificate Key
    help_text: The value can either be a path to a file containing the key in the PEM or DER encoded form, or it can be the string of a PEM encoded key
  - id: ldap_certificate_password
    type: string
    label: LDAP Certificate Password
    secret: true
    help_text: The password used to decrypt the certificate key specified by LDAP Certificate or LDAP Certificate Key
required:
  - ldap_server
Injector configuration
env:
  MICROSOFT_AD_LDAP_SERVER: "{{ ldap_server }}"
  MICROSOFT_AD_LDAP_PORT: "{{ ldap_port | default('389') }}"
  MICROSOFT_AD_LDAP_USERNAME: "{{ ldap_username }}"
  MICROSOFT_AD_LDAP_PASSWORD: "{{ ldap_password }}"
  MICROSOFT_AD_LDAP_AUTH_PROTOCOL: "{{ ldap_auth_protocol | default('negotiate', true) }}"
  MICROSOFT_AD_LDAP_CERT_VALIDATION: "{{ ldap_cert_validation }}"
  MICROSOFT_AD_LDAP_CA_CERT: "{{ ldap_ca_cert }}"
  MICROSOFT_AD_LDAP_CERTIFICATE: "{{ ldap_certificate }}"
  MICROSOFT_AD_LDAP_CERTIFICATE_KEY: "{{ ldap_certificate_key }}"
  MICROSOFT_AD_LDAP_CERTIFICATE_PASSWORD: "{{ ldap_certificate_password }}"
Save and now we can create credentials.
2. Create a Credential for ‘Microsoft AD LDAP’
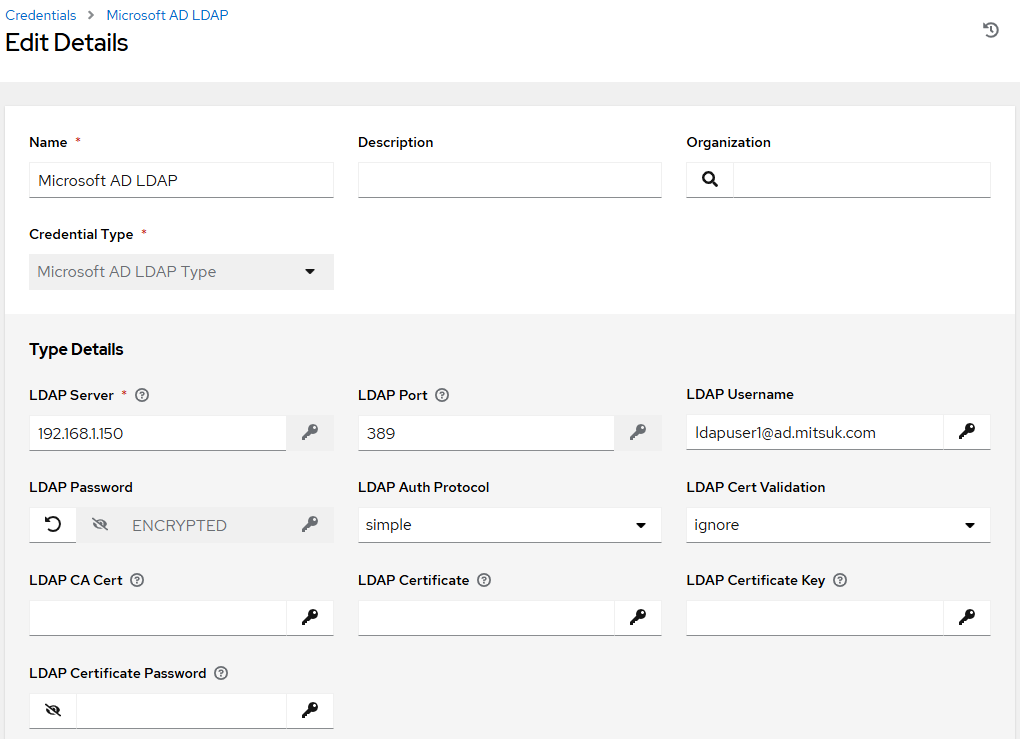
From AWX Web portal, go to Resources >> Credentials >> click Add
Name: Microsoft AD LDAP
Credential Type: Microsoft AD LDAP Type
LDAP Server: your-AD-server
LDAP Port: 389
LDAP Username: user@domain
3. Add Inventory/Playbook File to Your Git Repository
For this, I created inventories/microsoft.ad.ldap.yml with following code
# Name the file microsoft.ad.ldap.yml

plugin: microsoft.ad.ldap

### Supplied by custom credential type ###
# server:
# port:
# username:
# password:
### End custom credential type ###

search_base: DC=ad,DC=mitsuk,DC=com
# search_base: OU=Servers,OU=Computers,OU=LDN,DC=ad,DC=mitsuk,DC=com
4. Synchronize the Project Connected to Your Repository
Sync the Project connected to your Git or Source code repository.
5. Create an Inventory for ‘Microsoft AD LDAP Inventory’
From AWX Web portal, go to Resources >> Inventory – click Add >> Add Inventory
Name: Microsoft AD LDAP Inventory
Click Save, then go to Sources tab, click Add
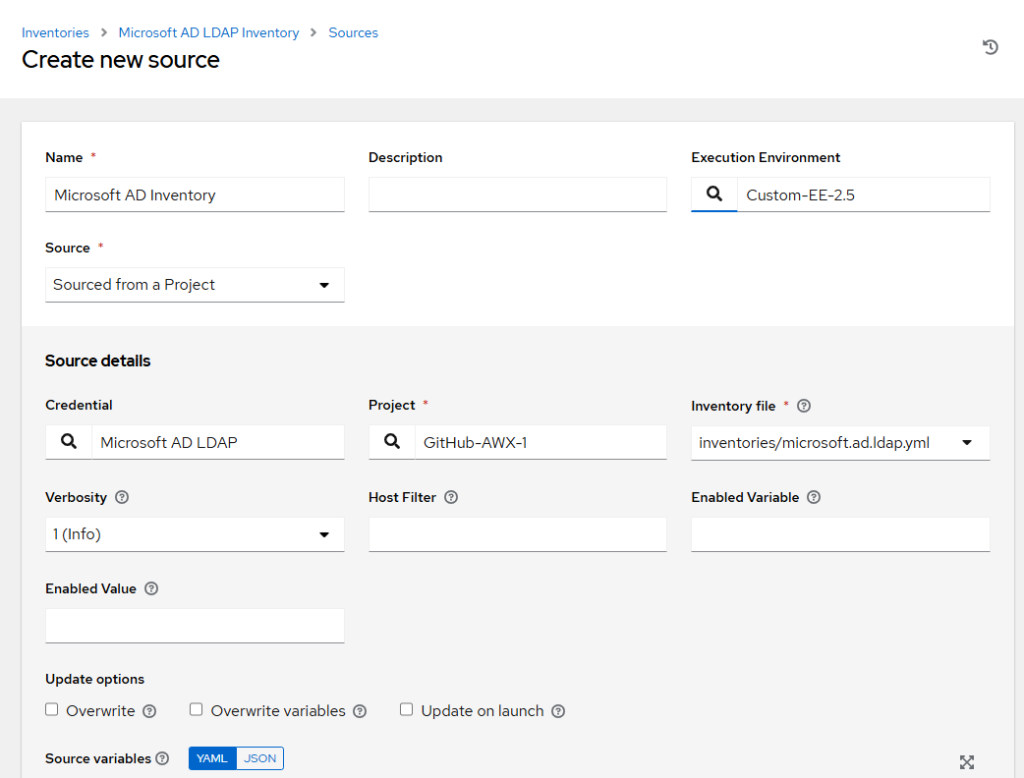
Click Save, then click Sync
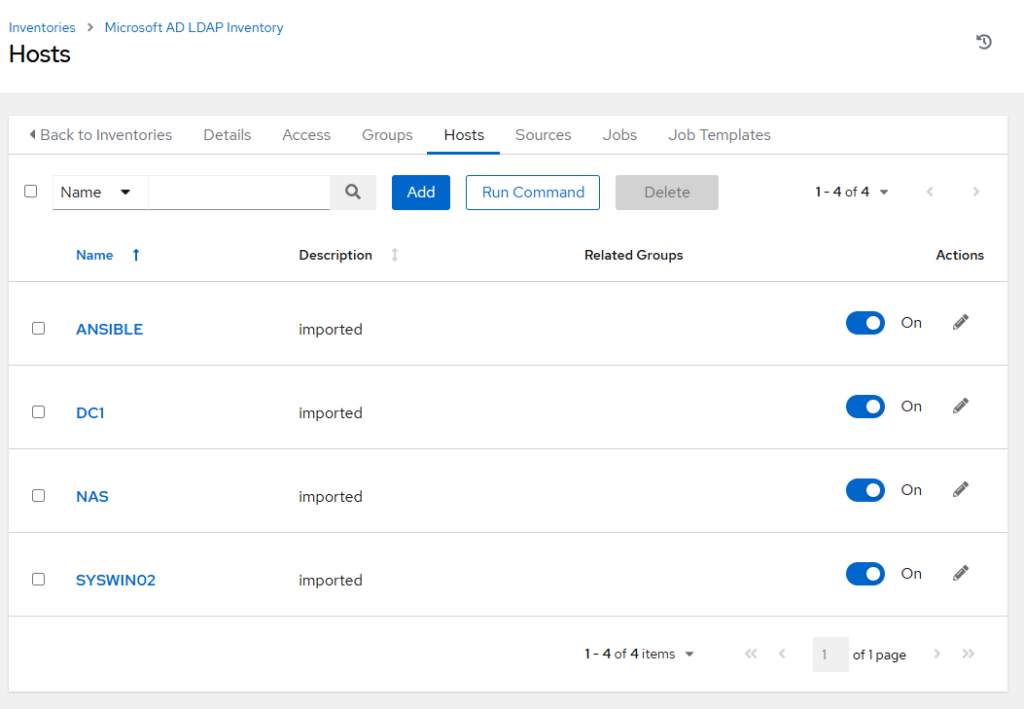
If successful you will see the computers under Hosts Tab:
Pre-requisites:
EE Environment: Must have the following:
- dnspython – For option server lookup support
- pyspnego >= 0.8.0
- pyspnego[kerberos] – For Kerberos and server lookup support
- sansldap
- dpapi-ng – For LAPS decryption support
If you don’t have a suitable EE environment which includes the above then follow my tutorial/blog: creating-a-custom-ee-for-awx/
And a requirements.yml file with the following content:
---
collections:
  - name: awx.awx
  - name: microsoft.ad
Leave a Reply